Monday, April 30, 2012

Oreo Stuffed Chocolate Chip Cookies

These are too good to put into words. Make them. I happenednto "stumble upon" this recipe from the Very Culinary website which is where the unbelievable picture below came from, in addition to my own photos from my first trial run. They are easy to make and although it may seem like you have enough dough for two dozen cookies, the recipe actually makes around 10 gigantic cookies (despite what the recipe on VeryCulinary.com says) which pretty much look like mini pies since they have to be large enough to fit an Oreo in the center. Share these or you will eat them all. Here's what you'll need:


Ingredients: 
• 1 cup (2 sticks) softened butter
• 3/4 cup packed light brown sugar
• 1 cup granulated sugar
• 2 large eggs
• 1 tablespoon vanilla extract
• 3 1/2 cups flour
• 1 teaspoon salt
• 1 teaspoon baking soda
• 2 cups semi-sweet chocolate chips
• 1 package Double Stuff Oreo cookies


Directions:
Oven to 350 degrees.


In a bowl, cream together the butter, brown sugar, and white sugar with a mixer (or whisk) until combined. Add eggs and vanilla and blend until batter is smooth. Set aside.


In another bowl, sift together the flour, salt, and baking soda. Stir to combine and then slowly add this dry mixture to the bowl of wet ingredients just until combined. Add chocolate chips and fold into the batter without over mixing.


With a cookie scoop (or just your hands) form balls with the dough, making sure they are large enough to fit an Oreo cookie when slightly flattened into a disk shape.


Select two balls of dough, one to cover the top of the Oreo and the other to cover the bottom. Flatten one ball slightly to accommodate the Oreo cookie. Turn up the edges of the dough so they somewhat wrap along the sides of the Oreo. Place the other ball of dough on top and form to fit and cover the other half of the Oreo. Seal the edges of the dough by pinching all the sides together so that the Oreo is no longer visible (yes, they will look huge)


Place onto a parchment lined baking sheet or a greased baking sheet and bake cookies for approximately 13 minutes or until golden brown. Let cool for 5 minutes before transferring to cooling rack.


Pour an ice cold glass of milk and enjoy!

Mini Reese's Peanut Butter Cup Cookies

Recently my Mom sent me an Easter basket, as she has always done since I left for U of O 3 years ago. Inside, she had given me a bag of mini Reeses and since I love to bake, I decided to transform these into cookies! I looked up a recipe, and instead of following it exactly I decided that rather than placing an individual cup inside each ball of dough, I was going to chop them up into pieces and gently stir them into the entire batch of dough. The result? Delicious chocolaty-peanut-buttery cookies that my roommates loved! I highly recommend these for any of you whose favorite ice cream flavor happens to be peanut butter and chocolate (like me!). Enjoy!


Ingredients
  • 1 3/4 cups all-purpose flour
  • 1/2 teaspoon salt
  • 1 teaspoon baking soda
  • 1/2 cup butter, softened
  • 1/2 cup white sugar
  • 1/2 cup smooth peanut butter
  • 1/2 cup packed brown sugar
  • 1 egg, beaten
  • 1 teaspoon vanilla extract (I prefer vanilla bean paste for a richer, fuller vanilla taste)
  • 2 tablespoons milk
  • 20-30 miniature chocolate covered peanut butter cups, unwrapped 

Directions

  1. Preheat oven to 375 degrees F. Sift together the flour, salt and baking soda; set aside.
  2. Cream together the butter, sugar, peanut butter and brown sugar until fluffy. Beat in the egg, vanilla and milk. Add the flour mixture; mix well. 
  3. Carefully chop the peanut butter cups into pieces, they don't have to be too small, cut in half or thirds is probably ideal. Add the peanut butter cups into the mixture, gently stirring just to incorporate the cups and being careful NOT to crush them too much. 
  4. Shape into teaspoon-sized balls and place each into a cookie sheet lined with parchment paper.
  5. Bake at 375 degrees for about 8-10 minutes. Cool slightly, carefully remove from pan, and place on cookie drying rack. 
  6. Serve with a tall glass of milk!


Wednesday, April 4, 2012

Mini Pumpkin Cheesecakes

We made these with a mini pumpkin mold cupcake pan from Williams Sonoma, but not only are they pumpkin shaped, but they are also pumpkin flavored! Really good and perfect for the holidays, or any occasion as we make these whenever we want a bite sized dessert. The actual recipe is a spin-off from one of our favorite Food Network stars Ina Garten. We transformed her traditional Mixed Berry Cheesecake into these mini, pumpkin cheesecakes following the instructions below: 


For the crust:

  • 1 1/2 cups graham cracker crumbs (10 crackers)
  • 1 tablespoon sugar
  • 6 tablespoons (3/4 stick) unsalted butter, melted

For the filling:

  • 2 1/2 pounds cream cheese, at room temperature
  • 1 1/2 cups sugar
  • 5 whole extra-large eggs, at room temperature
  • 2 extra-large egg yolks, at room temperature
  • 1 8 oz. can of pumpkin puree
  • 1 1/2 teaspoons pure vanilla extract

Directions:

Preheat the oven to 350 degrees F.
To make the crust, combine the graham crackers, sugar, and melted butter in a food processor until moistened. Pour into a 9-inch springform pan. With your hands, press the crumbs into the bottom of each individual pumpkin in the pan and about 1-inch up the sides. Bake for 8 minutes. Set aside and cool to room temperature.
Raise the oven temperature to 450 degrees F.
To make the filling, cream the cream cheese and sugar in a food processor, about 5 minutes. Add the eggs and egg yolks, 2 at a time, mixing well. Scrape down the bowl and beater, as necessary. Finally, with the food processor still on, add the sour cream, pumpkin and vanilla. Mix thoroughly and pour into the cooled crust of the individual molds.
Bake for 15 minutes. Turn the oven temperature down to 225 degrees and bake for another 1 hour and 15 minutes. Turn the oven off and open the door wide. Allow the mini cakes to sit in the oven with the door open for 30 minutes. Take the tray out of the oven and allow it to sit at room temperature for another 2 to 3 hours, until completely cooled. Wrap and refrigerate overnight (TRUST US, THESE TASTE EVEN BETTER THE NEXT DAY! so try to make them a day before you want it!)
Remove the cakes from the pan by carefully running a hot knife around the outside of each individual mold. Poke the mold from the bottom to pop the cake out of the pan. Plate on a platter and serve!


Thursday, July 28, 2011

Cinnamon Swirl Blueberry Bread Pudding

Okay so the name sounds long, but we altered an original blueberry bread pudding recipe with cinnamon swirl bread instead of the traditional day-old baguette and the result was delectable! The cinnamon bread really makes a big difference because its sweetness combined with the tartness of the blueberries is amazing...trust us! We highly recommend this, especially because its great for dessert or breakfast and is a tasty deviation from the traditional bread pudding with raisins. Enjoy! 


Ingredients: 
1/2 tsp lemon zest (optional)
2 cups fresh (or frozen & thawed) blueberries
3 tbs. powdered sugar
3 cups of milk (we used 1%)
3 large eggs
1/2 loaf-3/4 loaf stale Cinnamon Bread*
1 cup granulated sugar
1/4 tsp almond extract
1/2 tsp vanilla extract


*We used our local favorite Greenlees Best Cinnamon Bread, it is all-natural and, as most people know, absolutely delicious on its own*

Directions:
(1) Preheat oven to 350 and grase an 11 x 7 in. baking dish
(2) Whisk together the milk, eggs, sugar, extracts, and zest. 
(3) Tear up the 1/2-3/4 loaf of cinnamon bread and place it in a separate bowl. 
(4) Once all the bread has been torn (this process is similar to a "rough chop" the pieces don't need to be any certain size. In fact, odd size pieces is probably better!) and placed into the bowl, add the milk mixture and let stand for 15 minutes. 
(5) As the bread soaks, toss the blueberries with the powdered sugar and stir into the bread mixture once it has set. 
(6) Pour into the prepared baking dish and bake for about an hour, or until the bread pudding is set and lightly browned on top *ours took about an hour and a half so monitor it after an hour*
(7) let cool for 5 minutes and serve warm


Yummy! 


Monday, June 20, 2011

Banana Cream Pie

I just recently made this for my dad for Father's Day because banana cream pie has always been one of his favorites. It was delicious and a hit at the Father's Day bbq we had at our house! The crust is definitely the best part...be prepared for the entire pie to be gone once you put it out!


Ingredients
For the yummy crust: 
2 cups graham cracker crumbs
1/4 cup sugar
1/2 cup unsalted butter melted and cooled
For the pie: 
3/4 cup white sugar (and an addition 1/4 cup for the meringue) 
  • 1/3 cup all-purpose flour
  • 1/4 teaspoon salt
  • 2 cups milk
  • 3 egg yolks, beaten **KEEP THE EGG WHITES, you will need them for the meringue topping!**
  • 2 tablespoons butter
  • 1 1/4 teaspoons vanilla extract
  • 4 bananas, sliced

  • The first step in creating the pie is making the crust. Position a rack in the middle of an oven and preheat to 350 degrees. To make the crust, in a food processor fitted with the metal blade, combine the crumbs, sugar, and melted (cooled) butter. Process until the crumbs begin to stick together. Scoop the crumbs into a 9x9 in. pie plate, pressing the crumbs firmly on the bottom and sides of the plate (you will probably have leftover graham cracker crumbs so save them for a mini pie!). Bake the crust for 10 minutes until it sets, then remove it from the oven and let it cool. 


Keep the oven on at 350 degrees, and while the crust cools begin preparing the pie filling:Sift together the sugar, flour and salt and combine in a saucepan. Add milk in gradually while stirring gently with a whisk. Cook over medium heat, stirring constantly, until the mixture is bubbly. Keep stirring and cook for about 2 more minutes, and then remove from heat.


Then, add a little bit of the hot mixture to the beaten egg yolk mixture. Once combined, immediately add this mixture to the rest of the hot mixture and stir in. Place the mixture, in the saucepan, back on the heat and cook for 2 more minutes...stirring constantly. Remove from heat, and add butter and vanilla. Stir with whisk until the mixture is smooth. Add the sliced bananas to pudding mixture (setting aside 8-10 slices for garnish at the end) and stir them in gently so as not to crush the bananas. Then, pour the entire mixture into the now cooled pie crust. 


Place the pie in the oven and bake at 350 degrees for 12-15 minutes until the mixture appears not to be runny. Remove the pie from the oven and as it cools, begin making the meringue topping: 

To make the meringue, place leftover egg whites into a bowl and add 1/4 cup of white sugar. Beat the egg white and sugar mixture with an electric hand mixer on high speed until the mixture becomes stiff and forms peaks (about 3-5 minutes). Once the peaks have formed, gently scoop out the mixture and place on top of pie. Lightly spread the meringue so that it is not flat, but covers the entire top of the pie.


Set the oven to 500 degrees on the *broil* setting and place pie, now with meringue topping, into the oven. DO NOT LEAVE, it only takes a minute before the entire meringue burns so keep a close eye on the pie as it broils and remove promptly as soon as you see the top turn slightly brown. Let the pie cool, add extra sliced bananas on top for garnish, and then cover and chill for 1 hour before serving....trust me, its worth the wait!!

ENJOY!!


Thursday, June 2, 2011

Double Chocolate Layer Cake

Ok accomplishing this recipe was definitely one of my (Lisa) personal greatest achievements. I had never made such a delicious cake with multiple layers of velvety chocolate. I made it for someone's birthday cake and added the raspberries on top to add some color to an otherwise boring-looking cake. If you make this (and we hope you do!) definitely add a little color to give this cake the justice it deserves...it will look pretty and taste amazing. I found this recipe after looking at more than a dozen and chose it becuase out of the 1,400 reviews no one said it was less than heavenly. Take a look at the pictures we posted and then try to tell us that you aren't going to make that just to look at if its not all eaten in one sitting. Here's the recipe, courtesy of Epicurious!

Ingredients:
**be sure to have two 10- by 2-inch round cake pans handy**
For the cake layers:
3 ounces fine-quality semisweet chocolate (I used E. Guittard)
1 1/2 cups hot brewed coffee
3 cups sugar
2 1/2 cups all-purpose flour
1 1/2 cups unsweetened cocoa powder (not Dutch process)
2 teaspoons baking soda
3/4 teaspoon baking powder
1 1/4 teaspoons salt
3 large eggs
3/4 cup vegetable oil
1 1/2 cups well-shaken buttermilk
3/4 teaspoon vanilla
For the Ganache Frosting:
1 pound fine-quality semisweet chocolate (I used E. Guittard)
1 cup heavy cream
2 tablespoons sugar
2 tablespoons light corn syrup
1/2 stick (1/4 cup) unsalted butter

Directions: 
First Step--Make cake layers:
1) Preheat oven to 300°F. and grease pans. Line bottoms with rounds of wax paper and grease paper as well. (if you trace the shape of the cake pans on wax paper and then cut them out I found this step to be relatively easy)
2) Finely chop chocolate. Pour hot coffee into a bowl and then add the finely chopped chocolate. Let mixture stand, stirring occasionally, until chocolate is melted and mixture is smooth.
3) Into another large bowl sift together flour, sugar, cocoa powder, baking soda, baking powder, and salt. 
4) In another large bowl add eggs and beat with an electric mixer until the eggs have thickened slightly and are lemon colored (about 3 minutes with a standing mixer, 5 minutes with a hand-held mixer). Slowly add oil, buttermilk, vanilla, and melted chocolate mixture to the egg mixture, and beat until well-combined. 
5) Add sugar mixture to the wet mixture and beat on medium speed just until combined. 
6) Divide batter between pans and bake in middle of oven until a tester inserted in center comes out clean (about 1hr-1 hr & 10mins).
7) Cool layers completely in pans on racks. Run a thin knife around edges of pans and invert layers onto racks. Carefully remove wax paper and cool layers completely. 
**Note: Cake layers may be made 1 day ahead and kept, wrapped well in plastic wrap, at room temperature.
Step 2-Make Frosting:
1) Finely chop chocolate and put aside. 
2) In a 1.5 or 2-quart saucepan bring cream, sugar, and corn syrup to a boil over moderately low heat, whisking just until sugar is dissolved. 
3) Remove pan from heat and add the chopped chocolate, whisking until chocolate is melted into the mixture. 4) Cut the butter into pieces and add to the mixture, whisking until smooth.
5) Transfer this frosting mixture to a bowl and cool, stirring occasionally, until spreadable (depending on the chocolate used, it may be necessary to chill frosting to spreadable consistency). 
**Note: this is the most important step, if the frosting is too cold it will tear apart your cake when you try to spread it, and if it is too hot it will be too runny and make a mess of your cake**
6) Spread frosting between cake layers and over top and sides. Add garnish to top if desired (i.e. the raspberries I used in the pictures below)

If you plan on saving the cake for later, keep it covered and chilled and it will last about 3 days. However, be sure to bring cake to room temperature before serving...it tastes much better that way :) 
 
The End-Product

Raspberries on Top

 Lots of Moist Layers


Wednesday, June 1, 2011

Cinnamon Pull-Apart Bread

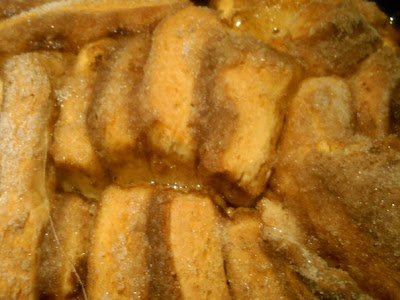
First of all we want to thank you, Joy the Baker for allowing us to "stumble upon" this recipe recently. It was just as delicious as you described :) It may be time consuming, but trust us...its worth it. I (Lisa) had friends visiting when I made this and we ate the entire thing in 1 day....yes, it was THAT good. Try it out and let us know what you think, we don't think you'll be disappointed. Moist and delicious in perfectly portioned squares! Definitely worth a repeat.


For the Dough:
2 3/4 cups plus 2 tablespoons all-purpose flour
1/4 cup granulated sugar
2 1/4 teaspoons (1 envelope) active dry yeast
1/2 teaspoon salt
2 ounces unsalted butter
1/4 cup water
2 large eggs, at room temperature
1 teaspoon pure vanilla extract
For the Filling:1 cup granulated sugar
2 teaspoons ground cinnamon1/2 teaspoon fresh ground nutmeg
2 ounces unsalted butter, melted until browned


Directions: 1) In a large mixing bowl whisk together the 2 cups of flour, sugar, yeast, and salt.  Set aside.
2) Whisk together eggs and set aside.
3) In a saucepan, melt together butter and milk until the butter melts.  Remove from the heat and add the water and vanilla extract.  Once mixed, set aside for 2-3 minutes.
4) Pour the milk mixture into the bowl of dry ingredients and mix.  Add the eggs and stir the mixture until the eggs are just incorporated into the batter.  As Joy the Baker mentions "the eggs will feel soupy and it will seem like the dough and the eggs are never going to come together".  Keep stirring.  Add the remaining 3/4 cup of flour and stir with the spatula for about 2 minutes. You want the mixture to be sticky.
5) Then, place the dough is a large,  greased bowl/dish.  Cover with plastic wrap and a clean kitchen towel.  Place in a warm space and allow to rest until doubled in size, about 1 hour.
6) While the dough rises, whisk together the sugar, cinnamon and nutmeg for the filling.  Set aside.  Then, melt 2 ounces of butter until browned.  Set aside.  Grease and flour a 9x5x3-inch  loaf pan.  Set aside.
7) After the dough has doubled in size, deflate the risen dough and knead about 2 tablespoons of flour into the dough.  Cover with a clean kitchen towel and let rest for 5 minutes.  On a lightly floured work surface, use a rolling pin to roll the dough out.  The dough should be 12-inches tall and about 20-inches long,but don't worry if its not long enough.  Just roll it as large as the dough will go.  Use a pastry brush to spread melted butter across all of the dough.  Sprinkle with all of the sugar and cinnamon mixture even though it might seem like it may be too much.
8) Slice the dough vertically, into six equal-sized strips.  Stack the strips on top of one another and slice the stack into six equal slices once again.  You’ll have six stacks of six squares.  Layer the dough squares in the loaf pan lined up one behind the other.  Place a kitchen towel over the loaf pan and allow in a warm place for 30 to 45 minutes or until almost doubled in size.
9) Place a rack in the center of the oven and preheat to 350 degrees F.  Place loaf in the oven and bake for 30 to 35 minutes, until the top is very golden brown.  The top may be lightly browned, but the center may still be raw.  A nice, dark, golden brown will ensure that the center is cooked as well.
10) Remove from the oven and allow to rest for 20 to 30 minutes.   Loosen it with a butter knife so that it easily slides out of the pan.
11) Serve warm with coffee or a BIG glass of ice cold milk. You'll need something to wash all that delicious down.
Cinnamon-Sugary Deliciousness
Close-up!